Tuesday 30 April 2013

How to create new Partition without Formatting a Hard Disk


If your Hard-disk contain 3 partitionsin your PC and you need to create 1 more partition then what will you do? Most of people are doing the following methods to create new partition in Hard-disk.

i.e; Format the Hard-disk and create a new partition.


Let’s see an easier method to create a new partition without formatting a Hard-disk.


To do this we don’t need any software and also no need to copy the data to separate drives. By doing the following methods we can create a New Partition from System Drive.


Right Click on My Computer. Click Manage. Now “ Computer Management” window will appear.
(if above step is not worked. then try the below step to open "Computer Management")

Click on Start button. search "Computer Management". then 'Computer Management' will appear. Click it.

In that window Click Storage


Then select Disk Management.


In that window Hard-disk and other Storage Media detail will be shown.


Now select a Disk drive to create a New Partition.


Right Click on particular Drive then Click Shrink Volume.


Now windows will show the free space in particular partition.


Type the disk size to create New Partition in Shrink Window.


Now click on “Shrink” , within few seconds a New Disk will be created.


Still Accessible is not done in New Disk.


Now Right Click on Unallocated Drive . Select New Simple Volume.


Click on Next. Now give a size to the New Partition. (you can choice wholesize right now)


Select a Drive letter and Click on Next.


Then select Format Setting ->


File System -> NTFS.
And keep others as default. (if you need you can change this)


Put a tick on “Performances a Quick Format” and Click on Next.


Now the New Partition is created successfully.


Fix Corrupted Files Of Windows


While reading the eBook of Microsoft Windows I found this command which helps us to fix the corrupted files of windows. 

You don't need any software or have to do tedious work only one command will do all it. So Just follow these simple steps.

Steps :

Step 1 : Open Run (windows + r).

Step 2 : Type cmd & hit enter.


Step 3 : Command prompt will be open just type sfc/scannow on command prompt & hit enter.


That's it Now all your corrupted files have been fixed.


How this command have been work :-

SFC (System File Checker) verifies all protected system files are current and complete. If they are not, it replies them to bring them into currency.

System File Checker gives an administrator the ability to scan all protected files to verify their versions. If System File Checker discovers that a protected file has been overwritten, it retrieves the correct versi on of the file from the cache folder*. (%Systemroot%\S ystem32\Dllcach e) or the windows installation source files, and then replaces the incorrect file. System File Checker also checks and repopulates the cache folder. You must be logged on as an
                                                                                                 administrator as a member of the

                                                                                                 Administrators group to run SFC.


* The DLL cache folder is replaced in windows vista and 7 with Windows File Protection (Files are kept in C:\Windows\wins xs\Backup)

How ever you can visit these sites for more information.

• SFC - Windows XP

• SFC - Windows Vista\7


Keep Playing With UR Computer……


How to remove Virus Manually in Windows


IT is very simple

Go to run >cmd and give enter

type attrib /s /d

should give every colon

ex:
c: attrib /s /d
d: attrib /s /d
g: attrib /s /d
note any SHR attribute and Queer name like amvo.exe,r6r.exe,autorun.inf etc

delete above named files

ex; c:\>del /f /s /a <filename with extension>

after removing this type of files and using ccleaner software

and remove the unused registry files.

now restart your system. again use ccleaner


New useful hotkeys (keyboard shortcuts) in Windows 8

There are a few useful hotkeys (keyboard shortcuts) introduced in Windows 8 which can make your Windows 8 experience better. Some of them are given below:


Win key                Toggles between Start Screen and Windows Desktop

Win+X                 Opens Quick Access Menu

Win+PrntScr        Automatically saves screenshot in Pictures folder

Win+C                 Shows Charms Bar

Win+I                  Shows Settings panel

Win+K                 Launches Devices charm

Win+H                 Launches Share charm

Win+Q                Launches Search charm

Win+W                Launches Settings search page

Win+F                 Launches Files search page

Win+Tab             Shows Metro apps switcher as mentioned in point 4

Win+Z                 Shows / hides App bar at Start Screen to show all apps

Win+Spacebar     Toggles between input languages and keyboard layout

Win+,                   From Start Screen peeks at the Desktop

Win+Enter            Launches Narrator

Ctrl+F1                Minimizes / maximizes ribbon in Windows Explorer

Ctrl+Tab              Launches All Apps list on Start Screen

Win+spacebar      Toggles between input languages and keyboard layout

Win+,                   Peeks at the desktop

Win+Enter            Starts Narrator

Win+PgUp           Moves full screen window (i.e., the new Metro UI) to the monitor on the left in multi-mon
                            situations.

Win+PgDn           Moves full screen to the right

Win+Shift + .        Snaps application and/or moves the snapped app to left

Win+.                   Snaps application and/or moves the snapped app to right

Win+k                  Opens Devices charm

Win+h                  Opens Share charm

Win+q                  Opens Search charm

Win+w                 Opens Settings search

Win+f                   Opens Files search

Win+z                   Toggle AppBar


How to Access Blocked Websites Without Using any Software

One of my friend told me that when he browsing internet at college, the biggest headache is always getting error messages while trying to access some famous websites, like Facebook, Twitter or YouTube.

I'm 100% sure, you might have also felt the same headache while trying to access the above mentioned websites at college or office. This is what you do when you get error messages.


You will go to Google search and start to type how to access blocked websites. Google is your best friend, because it knows many solutions for your single problem and it will show you a large number of working and not working tricks as result.

I have also did many googling and tried to find a way to access blocked websites. Finally i found an awesome trick to access blocked websites without using any software. And i'll share that trick with you all, i hope this trick will be useful to you while accessing websites at college or office. This trick is called as Bypass URL Filtering for Access Blocked Websites.


Lets see how to access blocked websites without using any software.


Go To Start -> Run -> In Run box type cmd and hit Enter

Now Open Command Prompt window will appear

In command prompt type Ping websites Address and Enter

For Example : If you want to access Facebook, type as follows

ping facebook.com

Now a IP Address will appear in command prompt to access facebook.com


After then type the particular IP Address (which appears in your command prompt) in address bar and open any websites. Now you can access any websites by using this simple method.


Note : This trick works depending on your college's or office's security measures.


Friday 5 April 2013

How to turn flash/pen drive into virtual ram


How+to+turn+flashpen+drive+into+virtual+ram

Hi Friendzz..Today I´m gonna show you how to turn flash/pen drive into virtual ram. It's not hard to turn an extra USB stick lying around that's collecting dust into extra memory for your computer, allowing it to run speedier and manage more applications better.
How to put a flash drive to good use by using it to increase the virtual RAM on your Windows computer.Using a USB drive smaller than 4 GB for this little trick. We've paraphrased some of the instructions for you below:
  1. Rename your thumb drive as "RAM DRIVE" or something similar, so you can see which drive is being used as RAM.
  2. Delete all the stuff on the flash drive. Check for hidden files.
  3. Right click on My Computer, and go to Properties. Once there, click on Advanced and go to the system output's Settings.
  4. Click on Advanced, and then Edit.
  5. Click on your thumb drive above, and select "user-defined size." Here you can see the size of your flash drive.
  6. Calculate the size of the flash drive, and subtract 5 Mb.
  7. Type this number in the first box. In the second box, type in the same number.
  8. Click Set and confirm all your settings, applying them wherever you can.
  9. Restart your computer.
Windows 7 users should go into their System Properties, under the Performance tab for these options. After you're done, your computer will recognize your flash drive as extra virtual memory. Do not pull out your thumb drive after these settings are implemented. It could crash your computer. Instructables has the whole tutorial, with step-by-step screenshots below.


How To Use USB flash/pen drive as extra virtual RAM


How+To+Use+your+USB+flashpen+drive+as+extra+virtual+RAM
Today I´m gonna show you how to use a usb pen drive as a virtual RAM.
The pen drive I used is a 2 Gb from Kingston. The size should be less than 4 Gb.
When you look at the sreenshots below you have to consider that it is in German.
Step 1:
Rename your pen drive  as "RAM DRIVE", so you can see that it is the one which is used as RAM.
Step 2:
Delete all the stuff one the pen drive. Look also after hidden once.

How+To+Use+your+USB+flashpen+drive+as+extra+virtual+RAM+Tricksdonor

Step 3:
Right click on "My Computer" --> Properties

tricksdonor

Step 4:
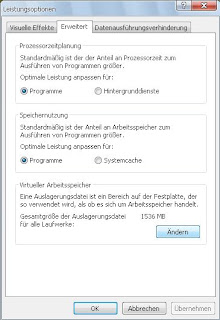
click on "Advanced" --> system output "Settings"

tricksdonor2

Step 5:


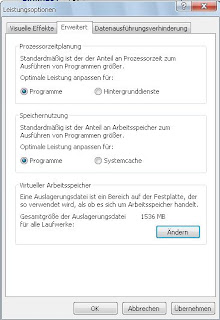
click on "Advanced" -->  "Edit"


tricksdonor3

Step 6:

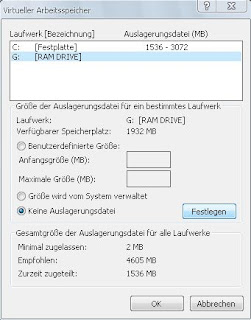
Click on your thumb drive above  --> "user-defined size"  -->
you can see the size of your flash drive (in this case 1932 Mb)
calculate: size of flash drive - 5 Mb
in this case: 1932 - 5 = 1927
Now type this number in the first box. In the second box you type in the same number (see picture) -->
click "set" and "OK"

tricksdonor5

Step 7:
Click "Apply", click not "Cancel" or  "OK".
After you have clicked "Apply", click "OK".
Restart your computer.

Warning:
Don´t pull out your thumb drive after you made this settings, because it´s used as virtual RAM device. It may crash your computer if you pull out your thumb drive. I´m not responsible for thoose cases.

tricksdonor6

If your computer didn´t get really faster or you have other reasons to remove the USB thumb drive than take the following steps:
Go to step 6 and choose your USB thumb drive, than click "no swapfile" --> "Set" -->"OK" --> "Apply"
Hit +1 or LIKE on fb to thank us!


How To Dual Boot Windows 7 And Windows 8


Do you want to test out the awesome new Windows 8 operating system but don’t want to lose everything you have customized on your Windows 7 OS? Windows 8 comes with an installer that give you the option of multi-booting, which is exactly what you want to do. Setting up a quick a easy way todual boot windows 7 and windows 8 isn’t hard to do. Here’s how:
One thing to note, this only works with Windows 7 and Vista. It will not work with XP.

Step 1: Back Your Stuff Up
Before you start the installation process you should at least back up your photos, videos, documents and any other settings or files that you think you might need later on. You never know what could happen during an installation process where you could potentially lose all your files. Windows 7 has a built in feature for backing up files. I would however, manually copy files over to an external hard drive for double backup.
dual-boot-windows-8-1
Step 2: Partition Your Drive
You’ll need to create a partition of at least 16GB for the side by side Windows 8 installation. Type “disk management” in the Start button’s text box, which will display a “Create and format hard disk partitions” choice at the top of the Start panel. Click on that to open the Disk Management utility. You’ll probably have two partitions. Right-click on the largest one, and choose Shrink Volume from the context menu.
dual-boot-windows-8-2
A “Querying Shrink Space” dialog will appear for a while, then another message will tell you how much free space can be squeezed out of the drive in MB. Enter a size above 16GB for the 32-bit version of Windows 8 and over 20GB for the 64-bit flavor, and then hit the Shrink button.
Step 3: Download The Installer
Now, it’s time to download the installer. As of this time, the only thing available is Windows 8 preview OS which you can get from Microsoft’s Windows 8 Release Preview ISO download page. Use Windows 7′s included disc image burning utility to create an installer DVD from the ISO file once you’ve downloaded it, or you can create a bootable USB key using the Windows 7 USB/DVD Download tool.
Step 4: Run The Windows 8 Installer
Pop in the installer DVD you burned or the USB stick you prepared, and restart your PC. Choose your language, then “Install Now.” After accepting the license, choose Custom installation. Now is when you’re presented with the choice of partitions, click “Drive options (advanced)” and then select the Unallocated space we created in step 2. Next, click New from the drive options icons below. Accept the full size displayed, and hit Apply.
windows-8-installer
Now we have a fresh partition to install Windows 8 onto. Hit Next and setup is off and running. Feel free to go grab some coffee or donuts while you’re waiting. Your system will then reboot into Windows 8 where you will setup your typical first-run options such as color, screen resolution, wifi and other settings. The next time you reboot your system you should see the startup screen as below where you can choose which operating system you would like to boot into.
windows-8-choose-your-system
By default, this screen displays for 30 seconds, and then Windows 8 launches. To change that default to your older OS, choose “Change defaults or other options” from the bottom of this multi-boot screen.
This should help you get your machine to dual boot windows 7 and windows 8. Let us know if you succeed or have any issues in the comments below.