Monday 3 March 2014

How To Speed Up Internet Connections Without Any Software

Internet takes a prominent place in today’s fast moving world. there are people who are completely addicted to it, but the problem that we all face today in using internet is Speed. internet itself got lots of software to improve its speed, but how many of those actually work perfectly? your reply would be simply "NO"


How to Speed Up Internet Connection Without Any Software

How would you feel if I tell you a way to increase the speed of your internet connection without any software or expenses? There is a simple windows trick available to do this task easily.

How to Speedup Internet Without Any Software?

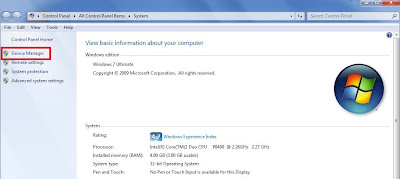
Right Click on My Computer

Click on Properties

Then click on Device Manager


How to Speed Up Internet Connection Without Any Software
Now Device Manager window will appear

In this, Double Click on PORTS (COM & LPT)


How to Speed Up Internet Connection Without Any Software  


Then, Double Click on Comunications Port


How to Speed Up Internet Connection Without Any Software


Now select Port Settings tab


How to Speed Up Internet Connection Without Any Software


Change Bits per second value to 128,000
And change the flow control to hardware


How to Speed Up Internet Connection Without Any Software

Now Click on OK

That's all, you have done !!! And when you browse the internet again, definitely you will feel the difference in speed.

Dear Friends !!! I kindly request you all to LIKE our Facebook Fan Page.
& Get Daily updates Easily.


Identify "FAKE ACCOUNTS" on FACEBOOK Using Google Images.


Now a days, Facebook accounts are rapidly increasing on Facebook and the only reason for that some people will try to dupe Facebook users for reasons of their own, from having a bit of fun, to duping for its own sake, right through to grooming people online or seeking to behave fraudulently. For your own sake, knowing how to spot a fake Facebook account is an important part of keeping safe online and remaining distant from people you don't know.


So, the question arise "How to Identify that Fake Facebook Account ??


Here's the solution anyone can detect the Facebook fake account just by following these simple steps.


Log in to your Facebook account and visit the profile you want to detect for fake.


Click on the profile picture and copy the image link (By right clicking and selecting "copy image URL").


Now continue by visiting Google Images.


The screen will be displayed as shown below.


Now click on the symbol shown in the screenshot:

And paste the image URL (selecting "Paste Image URL"). And Enter.


If the results displayed about that image with many links and images(shown below) than its a fake account. 


HOW TO AVOID FAKE ACCOUNTS ON FACEBOOK : 

1. Look for photos in the profile.If there is only one photo of the individual in the whole profile it makes it quite clear that the account is fake.


2. Look for status updates,wall posts and comments.If the user hasn’t updated a status for quite a long time and hasn’t been involved in any wall posting or commenting of other statuses,it means that the profile is likely to be fake.


3. Look at the recent activities.If it is that the user has just been adding randomers and making new friends,and that there are no pages liked or groups joined,it suggests that the user is determined in jst adding people and hence the profile is fake.


4. Check out the friend list.If found that maximum of the friends are of the opposite gender,it can be assumed that the profile is used either for fun or for random dating.
5. Check the info.If found that there is no ideal links given regarding school or education institutions or workplace and that the user is looking for dating and interested in both men and women,it shows signs of fakeness.
6. Check the birthdate.Birth dates like 1/1/XX…..or……31/12/XX are common between fake accounts as it is quite unique and easy to type in.
7. Fake profiles of girls usually have a contact no. in their info. Lets face it,girls harldy will have their contact no. in public.So watch out if the user exposes info that is unlikely for general users to unveil in public.
8. Look out for recent wall posts, if u see loads of people asking…’THANKS FOR THE ADD….DO I KNOW YOU’……and yet the posts remains unanswered…it is bound to be a fake one.
9. Look for common tarits used in Facebook,like.using applications such as farmville,pet society etc….and adding siblings.If these traits are not found among the user, the profile is highly inactive or fake.This point can’t single handedly prove the fakeness,however this will be a supporting clue along with other points.
10. If you are quite certain about the profile’s fakeness,and want to be absolutely sure, try browsing google for some random profile pictues. Fake profile pictures are usually selected frm google and while browsing through it,you might as well come upon the picture the user chose for the fake account. 


So that's it, if have any problem feel free to inform in comments.


PLEASE COMMENT ON THE POST IF YOU LIKED IT.


Auto ShutDown PC With Timer


Step 1:Right click on your desktop and choose "New=>shortcuts".
 

Step 2:In The Box That Says "Type The Location Of The Shortcut",Type In "Shutdown -s -t 3600" Without The Quotation Marks And Click Next.
 

Note: 3600 Are The Amount Of Seconds Before Your Computer Shuts Down. So , 60secs*60mins=3600 Secs.
 

Step 3:Make Up A Name For The Shortcut And You're Done.You Can Change The Icon By Right Clicking => Properities => Change icon => Browse.

To Abort :
 To make an abort key to stop the shutdown timer just create another shortcut and make the "location of the shortcut" to " shutdown -a" without the quotes.


Thursday 19 December 2013

How to Reduce Windows Startup Time

How to Reduce Windows Startup Time

Most Windows users follow the same routine every day—they push the power button ontheir computer and head off to make a cup of coffee. If that’s as long as it takes to boot up your system and all of your programs, then something’s not right.

What causes boot delays?

Some of the programs you install assume that you’re using them on a daily basis and as a result, they automatically load every time you start Windows. In 9 out of 10 cases, these programs never ask if you would like to run them all of the time. Finding the switch to turn this so-called “startup program” off is hard and often forces the user to dig deep into submenus of the particular program.

Over the course of a typical computer’s lifespan, an average of 25 to 35 programs automatically starts after you log on to the system. Some of these are actually pretty important and should never be disabled, for example, an antivirus scanner or a third-party firewall. Others, like Windows Live Messenger or Skype, are pretty convenient. However, most of the time you don’t need half of these programs popping up and causing your computer to take forever to start. Here are two tools to deal with slow boot-up performance, one for the absolute Windows guru who wants to know and modify every nuance of the boot process. The other is for professionals and beginners alike, it tells you everything you need to know about startup programs and lets you disable unwanted programs.


Day 1: Windows has just been installed, and less 
than a handful of programs are running automatically


Day 3: As users install their usual set of programs, more and more useless applications find their way into the notification area. Keep in mind: Not all of the startup programs are visible here; some of them are hidden. Imagine how this situation looks after a year of installing and using programs


Method 1: “Autoruns” by Mark Russinovich (Recommended for tech-savvy users)

Mark Russinovich probably knows the Windows kernel better than some of the original NT developers. In a smart move, Microsoft hired this Windows guru who developed “Autoruns” for Windows, which is now available in version 9 over at Microsoft TechNet.

Warning: This powerful piece of software simply lists every single file that Windows loads during the boot-up process, and even some of the more important kernel drivers within your system once you’ve logged on. If you’re a professional user and know what you are doing, this tool should prove interesting for you.
This is how it works:
1. Download “Autoruns”, and unzip the file “Autoruns.zip”. To run it, simply double-click on “Autoruns.exe”.


2. All startup objects are located under “Logon”. Make sure not to disable the entries “explorer.exe” and
    “userinit.exe”, since they are responsible for the logon process and your desktop. Vista and Windows 7
     users can find regularly run tasks, such as Apple software and Google Updates, under “Scheduled
     Tasks”. Again, this tip is only recommended for advanced users, and even they should create a system
     restore point at the very least.

3. If you can’t recognize an entry here, consult Google or Bing. You will instantly find yourself looking at a
    process database or a forum entry where the autorun entry in question is discussed.


Method 2: TuneUp StartUp Manager (Recommended for both home users and professionals)

If you’re a bit scared about the hundreds of possible entries you can disable with “Autoruns” for Windows, you will find yourself very satisfied with the TuneUp StartUp Manager featured within TuneUp Utilities —grab a free 15-day trial over athttp://www.tune-up.com/download. This tool is much more visual and only shows those programs that run automatically and are safe to disable. It’s excellent for home users and professionals alike. Here are some simple steps to get it working:

1. Download and install TuneUp Utilities. Go to “Increase Performance”, and select TuneUp StartUp
    Manager.

2. In the next window, you will find a list of all of the programs that are loaded at every Windows start:


3. TuneUp StartUp Manager is able to identify thousands of common and popular startup items, and tells
    you whether they are unnecessary, as in the example of Adobe Reader Quick Launch, or necessary, such
    as the Windows Defender. In the left hand pane, you will see a description for most startup programs,
    telling you exactly why it’s there and what it does. Even if TuneUp StartUp Manager is not able to find
    anything, there’s still the option of asking Google or Bing for advice!

Final thoughts
Depending on how many startup programs are automatically loaded by your system, you are able to decrease the boot-up time immensely. In addition, without unnecessary garbage running in the background, your computer will perform significantly better. So, if you’re an admin and you know what you’re doing, we recommend you go through each and every entry of “Autoruns” for Windows as outlined above. For everyone else, we recommend TuneUp StartUp Manager. Based on its feedback and descriptions, it’s just so easy to get rid of all of the unnecessary startup items and boost your PC’s performance.

How to Remove Ads from Android Apps, Games & Browser

remove-ads-android

Earlier I have posted on how you can easily remove all the spammy advertisements, bulky popups and any other virus attacking stuff in your windows computer without using any software, well this post is part of that thing and we are going to use the same thing for getting rid of advertisements in Android free apps, games and browsers you use to browse the web. 
 Now if you really feel bad watching all those bad advertisements in your free apps and games and even browsing some websites online then we have a simple solution that will block all those advertisements for free using no software.

Removing Advertisements from Android :)

So now the steps are pretty simple, we will be using that HOSTS file blocking trick to get this thing working, so now just follow below steps and enjoy.
  1. Open this text file online and copy its contents in a new notepad file or download it to your PC.
  2. Now you have the file if you have downloaded the file just make sure to rename the file as "hosts" its really important.
  3. So now you have the "hosts" file that you need to place in your Android device in order to remove all those advertisements.
  4. Now just transfer this file to your android device and open your file explorer on your android device. (use a free file explorer like F-explorer)
  5. Now just copy the file on your android device and paste it in to /etc or /system/etc, now if there is already a hosts file present just rename it to hosts.bak (to create backup of older hosts file)
  6. Now just paste your new hosts file over here, make sure you have the administrative right's to paste the file.
  7. That's it guys now just reboot your android device and see this trick working.
Now after you reboot your device you will see how all the advertisements in your apps, games and browser are vanished away, now sometime if might feel awkward as every single ad will be gone but still if you want a clean screen then this is the way.


How to Obtain a Custom Username for Google+ URL

Google+ recently introduced custom URL for everyone who was eligible to get it for their personal profile, so earlier they gave the custom URL to all the big stars but now small newbies were in luck to avail this special feature to make their profile look much more short and simple.
Well now you might have received a email from Google+ regarding your profile username eligibility or you might have seen that notification bar if you are regular user of Google+ if you not we still have a simple way to avail this feature and get you a simple custom URL for your google+ profile page.


Now everyone is not able to get tis custom URL, well you need to have a proper userbase on Google+ in order to get this custom URL, well if you are a regular user then this feature would be surely available for you so let see how you can apply it.

  1. Visit Google+ and Sign-In.
  2. Now navigate to Profile > About, so now if you are eligible for this feature then you might be able to see a black bar sliding with text (your profile is eligible for custom URL) or scroll down to Links section and press Get URL.
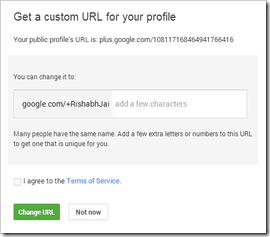
  3. google  custom urlNow you will see some popup like on the right hand side.
  4. So now if your was available you you will see a green arrow on the right, else you need to enter some more number's or alphabets in order to get your available custom name.
  5. Now after you see the green mark just press Change URL option and it will ask for confirmation that if you really wanna make a change with the name chosen.
  6. So now choose Accept and enjoy your new Custom Google+ URL.

So guys that's it now you will have a nice custom URL for your Google+ profile, have fun sharing this with all your friends, Enjoy.


Saturday 5 October 2013

Forgot Android Lock Pattern 3 Methods to Unlock Device


Android introduced lock pattern security feature that looks awesome and encrypts your device securely, but this can be a problem in case you have forgotten your lock pattern or you have just entered them invalidly for a quit good times. So now you need to unlock your device and get back into your OS, well the one easy way is to bang your phone onto the wall and that might help you in getting rid of that filthy pattern but if you do not want to loose your phone then we have three simple ways that will allow you bypass your lock pattern on Android device.

 
Well first method includes a simple way of logging in to your Google account and then getting RID of that lock pattern but if you have forgotten your email too then the second method could handy that includes executing few lines of script in command prompt which will allow you to write any pattern and to get into your OS and the third one is hard resetting your device and deleting all the users data.


#1. Unlock Lock Pattern using Email Option

Well this is easiest and recommend way of getting rid of that lock pattern if it works, so you just need to add wrong pattern for 5 times and then if will show you the Forgot Lock Pattern option, then you can login through your Google account and bypass the lock pattern system on your device.


#2. Unlock Lock Pattern using Command Prompt

This is the second way and its confirmed by many online website's that it works great, so lets just hop into the tutorial on how it actually works.
  1. Connect your Android Device to your PC.
  2. Now open Command Prompt as an administrator.
  3. Now type below code into it and press enter. adb shell
    cd /data/data/com.android.providers.settings/databases
    sqlite3 settings.db
    update system set value=0 where name='lock_pattern_autolock';
    update system set value=0 where name='lockscreen.lockedoutpermanently';
    .quit
  4. Now you will some screen like below and then you can reboot your OS and now when your device boots up again try unlocking your device using any lock pattern and it will work pretty fine.
    cmd-prompt
  5. If you face any problem repeat same steps but instead of the above code try using adb shell rm /data/system/gesture.key and press enter and now try rebooting your device and see if it works.

#3. Unlock Lock Pattern using Hard Reset Option

So this is the third method and even developers this works like a charm too, well we will be using the inbuilt Android feature that's Hard reset (every phone has this feature) and this will delete all the user's data which will unlocks the device.

Note This method will remove everything from your device except stuff on your SD Card, so make sure you attempt it only if none above method works and you seriously need to unlock your device.
  1. Shut Down your Android Device.
  2. Now we need to hold few buttons combination in order to get our device booted in, well every phone can have different combination so normally its Volume UP + Power button so try that else use below from popular devices.
    • Nexus 7 - Volume Up + Volume Down + Power
    • Samsung Galaxy S3 - Volume Up + Home + Power
    • Motorola Droid X - Home + Power
    • Now these were the popular phones I know, but you have any other phone and above combination is not working then you can Google your phone combination keys and you will get something for sure :)
  3. So now as soon as you see your phone's logo you can release the Power but you should keep holding the Volume Button till you get into the Recovery Mode.
    android-recovery-mode
  4. Now you will see some screen like above just navigate to wipe data/factory reset using volume keys and then press Power button to activate it.
    wipe-android-data-factory-reset
  5. Now you will get the Yes and No option (Google is creative in this isn't it) so slide down to that Yes -- delete all user data option and press that.
  6. Now it will wipe clean your device and will remove all the restrictions and now you can once again login to your OS. Well you can see below video tutorial too for easier access to your recovery mode.
So possibly these were the three methods I think that can be used to unlock your lock pattern on Android Device, well if you think you have some other easiest way then do comment below I will add that method too :)